Daisypath - Personal pictureDaisypath Anniversary tickers
Showing posts with label Friends. Show all posts

Monday, March 4, 2013

Recipe Challenge February: Corn!!

Welcome to february's recipe challenge! This month is was my turn to pick... Only I didn't know it right away! Off the top of my head all I could come up with in that moment was... Corn. Yep. Vodka was also included, but there weren't too many recipes I could think of that included both corn and vodka, but I can think of a few that include corn while drinking vodka!

The last time I was in Utah visiting family, I was given this old school green recipe box that belonged to my grandmother, I actually found this recipe in there! I have no idea if it originated with my grandmother, or if it was passed on to her from a friend, but it included corn... So we're makin' it!

Drum roll please...

This month we're making CORN RELISH! :) Yes, yes, there can be corn in relish, I know there are some non-believers out there, but it really is quite good!

I am quite happy to report that since the first recipe challenge I have learned to be prepared! I actually had a list when I went to the grocery store! It was shocking! So let's go over what you need...

Ingredients:
9 Cups Frozen corn kernels, thawed
3 Cups finely chopped cabbage
1 Cup finely chopped onion
1 Cup finely chopped, seeded red bell pepper
4 Cups White Vinegar
3 Cups granulated sugar
1 Cup water
2 Tbsp Dry Mustard
1 Tbsp Celery Seeds
1 Tbsp Mustard Seeds
1 Tbsp Salt
1 Tbsp Ground Turmeric
7 Pint Jars, cleaned and ready to go... Because we're canning this recipe!

The recipe is super simple, combine all ingredients in a large saucepan...


Once all Ingredients are combined, bring to a boil over medium-high heat, stirring frequently...


Reduce heat and boil gently, stirring occasionally for about a half an hour or until the liquid is reduced and the veggies are tender-crisp.

While cooking the mixture take a few moments to prepare your jars... If you've forgotten the steps you can go back to the previous recipe as a refresher... Your jars should be cleaned and in your water bath simmering (remember, do not boil them!), and your two-piece closures should be ready to go, clean the bands and put the lids in a saucepan of water to warm them.

Once the mixture is ready, start fillin' your jars! Remove one jar at a time from your canner, pouring the water back in to the canner (you don't need to dry the jar), you can use a canning funnel or just ladle your relish right into the jar. Leave about a half inch of head space, use a non-metal utensil to remove any air bubbles from the jar and place your lid and band on the jar.


To process the jars, place them back in the canner and make sure they are covered by at least one inch of water. Cover the canner and bring the water to a full rolling boil over high heat. Continue to process the jars on high heat for another 15 minutes, only starting your timer when the water gets to the rolling boil. Turn the heat off, remove the lid from the canner and wait 5 minutes before removing your jars. Without tilting the jars, remove them from the canner and place them upright in a draft free area to cool. After 24 hours, check lids for seal... And voila! Corn Relish!


This recipe as it is, is a sweet relish, but you can kick up the heat like I did by adding hot pepper flakes. I also added parsley, Old Bay Seasoning (because it's awesome on everything), hot black pepper, chopped garlic and a little cayenne.

This relish is a nice colorful extra to your dinner table, and is awesome with deli sandwiches, wraps, as a side, in an omelet, and it is divine in salads! I hope you enjoy it as much as we do!

To check out more of February's Recipe Challenge, check out these blogs:

Becka's Blog - Recipe Hapiness
Mike's Blog - Vegan Gourmand


Until next month... Be Happy, Live Freely, Laugh Often and of course Eat Well! ;)

Thursday, January 31, 2013

Recipe Challenge January: Lemons!!

Nothing to brighten up a grey wintery day like a bowl full of cheery lemons!

So as you can see by the title of this blog post, this month's secret ingredient was LEMONS!


For this challenge I was a bit more prepared than the last challenge! I had a plan this time, and actually remembered to shop for ingredients other than the main one! My inspiration for this month's challenge came purely from nostalgia. Some of the most fun I had was canning food with my grandmother as a child. Yes, I said canning! Sounds rad right!? (I am sure some of you are scratching your head and wondering what was wrong with my childhood...)

A few weekends ago I busted out the canning supplies and got creative... The outcome was ginger pear marmalade, and it was awesome! And so much fun to make! So it was no surprise that when the secret ingredient was announced I went back to the drawing board to see what I could come up with! Obviously I couldn't do a jam, jelly or another marmalade, I have enough of that to last me through the year! Sooooo..... I decided one thing we never get sick of in this house is a good sauce! What kind of sauce? Strawberry lemonade sauce!

When I announced this is what I would be making, Ryan started listing all the things he could put it on... Including: Pancakes, waffles, crepes, lemon cake, cookies, ice cream, buttered french bread, and OMG! I get it Ryan, you will be putting it on everything!

That being said, let's get our canning supplies out and get this recipe started!

We're doing this one step-by-step!


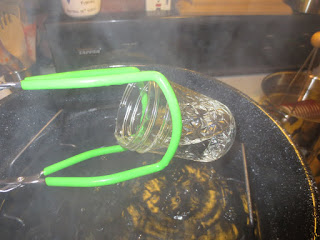
First thing we need is... JARS! You will need 12 of them to be exact! Make sure your jars are clean, and your two part closures are washed well in warm soapy water. Place your jars in your water bath, making sure each jar is filled and covered with water. Keep the jars warmed in the water until you are ready to fill them. DO NOT BOIL THEM!


Next, take your lids and put them in a sauce pan of water. You don't need to boil them, but you do want them warmed.


So let's go over the ingredients...
6 Lemons
6 lbs of Fresh Strawberries, hulled and crushed
6 Cups Granulated Sugar

Keeping it simple!

Take your lemons, using a sharp knife or zester, remove the peel and place in a small sauce pan and cover with water. Set the peeled lemons and the mixture aside for later.


Next comes the fun part... The Strawberries!! Mmmmmmm...

A potato masher is a great way to get the job of crushing done!


Once you have all 6 lbs of strawberries crushed and transferred to your sauce pan, add the sugar and mix it all together...


Next, take your lemons and add the fresh juice to the strawberry mixture...


Simmer the rind and water until the rind is tender and the water cooks down a bit, then add to the strawberry mixture.


The rest of this recipe is essentially like making strawberry jam, except less sugar, no pectin and you do not want to cook the mixture until gel stage. Bring your strawberry mixture to a full rolling boil stirring frequently. Keep the boil going for 5 to 10 minutes while stirring, reduce heat to medium high and medium boil for another 10 to 20 minutes while stirring.


You want to boil the mixture just to the point of gel stage. You'll notice a foam starting to form on the surface, when the foam gets frothy remove from heat and test gel stage.


You want the gel stage to be light, the jelly drops should be light and syrupy.


Remove the mixture from heat and skim foam off the top of the mixture with a large spoon.


Remove your heated jars from the water, (no need to dry them off) and start filling them with the mixture...


To avoid spillage and burns while working with a runnier mixture, it's best to use a canning funnel and a sturdy pot holder, both are optional, but they do make things easier when you're trying to ladle a hot mixture into a jar!


When filling the jars, make sure you're leaving 1/4 inch of headspace.


Wipe the rim of each jar to make sure none of the mixture is left behind on the edge, place the lids on the filled jars and tighten the rings finger tight. You don't want to over tighten them. Return the jars to the boiling water canner.


Once the water gets to a rolling boil, cover the canner and process the jars for 10 minutes, starting the timer only when the water gets to a rolling boil. Remove from heat and remove lid from canner, leave jars sitting in the water for another 5 minutes. When removing the jars from the water keep them upright, try not to tip them. Place jars upright on a towel in a draft-free area and let cool, undisturbed for 24 hours. As the cans start to cool you should hear the lids on them start popping.

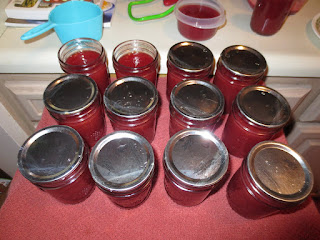
After 24 hours, check lids for seal. Remove rings aka screw bands and press down on the center of each lid with your finger. Sealed lids will be concave. If your jar did not seal properly you will have to refrigerate it immediately, or follow steps to reprocess. Wipe the jars down and, if desired, loosely reapply the rings.


Voila! Awesome strawberry sauce! I reserved some of the sauce to test and it was delicious! Ryan definitely approved as did the neighbors! I cannot wait for Sunday brunch to slather some fresh pancakes with this sauce!

Oh! Here's a pic of the marmalade...


I have a feeling I will have to post this recipe soon! Super yummy!

Well, that's it for this month's challenge! I hope you all had as much fun with yours as I did with mine!

To check out more of January's Recipe Challenge, check out these blogs:

Becka's Blog - Recipe Hapiness
Mike's Blog - Vegan Gourmand


Until next month... Be Happy, Live Freely, Laugh Often and of course Eat Well! ;)

Tuesday, January 1, 2013

Recipe Challenge December: Purple Potatoes!!

Yes, I know it has been a while. AND I know I am horrifically bad at updating my blog... (Here comes the broken record part...) I will make it a point to be better for 2013!!!!!!

Now that we have that out of the way, let's get to this fantastic and yummy post!

So last month I came across a facebook post from my friend Mike about a recipe challenge... A recipe challenge? What is this awesomeness you speak of?

Well, to sum it up, someone picks a secret ingredient (bet'cha can't guess what this month's secret ingredient is... I will give you a hint... It's in the title), everyone goes out and finds the secret ingredient and then cooks with it! There's more than that involved, but for the sake of time I am nut shelling it ;)

So this month it was on Mike to unveil the ingredient, purple potatoes! Now living in Los Angeles and being surrounded by wonderful establishments like Whole Paycheck, Trader Joe's and various farmer's markets, I thought finding this ingredient would be a piece of cake. After all, I found these little suckers in a remote Hawaiian village, how hard is it going to be to find them here? Oh, how wrong I was!

My awesome Hawaiian meal with purple Potatoes!

Whole Paycheck (Whole Foods for those of you who do not speak Keiranese) was a total bust, the fine employees at my local Ralph's looked at me like I was nuts when I asked for them, and don't get me started on Von's... I finally found my silver lining at Trader Joe's! Down side, purple potatoes only came in a variety pack, so... 5 bags later I had enough purple potatoes to do something creative with!

Yayy for variety! ;)

So I get my potatoes home and as I am unloading them I realize something... I have purple potatoes, but I have failed to gather any other ingredients. As you can see I prepared well for this challenge.

Oh yeah. I don't have a recipe either... Yep, totally prepared.

New plan, let's watch Kiki scrape together anything she can out of her fridge and pantry and cook something. Now that's a challenge!

Purchased Ingredients:
Purple Potatoes


Found Ingredients:
4 Green Peppers
Salsa
Tomato Sauce
Heirloom Tomatoes
Long Grain Rice
Small Can of Corn
Green Chiles
Smoked Turkey Sausage
Shredded Cheese
Taco Seasoning
Cayenne Pepper
Garlic Powder
and Old Bay Seasoning (Because it's awesome and it goes great on everything!)


So, this isn't exactly a traditional recipe, I can't even tell you how much of each ingredient I used, But I can tell you what I did and hopefully it will give you some fabulous ideas for your own kitchen creation!

Directions: Preheat your oven to 350 degrees. Cook 3 servings of long grain rice according to instructions on package (you can use instant rice, or a spanish rice steamer if you are short on time). Slice the smoked turkey sausage into small pieces and fry it up. Combine the turkey sausage with the rice and add the small can of corn, a few tablespoons of salsa, a small handful of cheese, 1/4 cup of green chilies, 1/2 cup diced heirloom tomatoes, a few dashes of taco seasoning, garlic powder, cayenne and old bay to taste.


Cut the tops off the green peppers and clean the seeds out. Fill each pepper half way full of rice mixture and set aside. Parboil purple potatoes and drain. Dice potatoes up homefry style and fry until you get a good crisp on them. Top the green peppers with the pan fried potatoes and place in a lightly greased baking dish.


Bake for 30 minutes or until heated all the way through. Top with shredded cheese and bake for another 15 minutes if desired.

So Gooey!!

Ryan giving this recipe two forks up!

This experiment turned out way better than I thought it would! I would definitely make these again!!

After the peppers were completed I had extra potatoes and extra rice mixture. I ended up mixing the two together and using it for burrito filling! So this recipe was a two-in-one and Ryan went "Forks Up" for both!

To see the other Recipe Challenges for December, check out these blogs:

Becka's Blog - Recipe Hapiness
Mike's Blog - Vegan Gourmand

We're still working on getting Kiki's Recipe Box updated and running, we'll also be putting the recipe challenge recipes there when the site goes live! So check back for updates :)

Have a Happy and Yummy New Year! xoxo

Sunday, February 6, 2011

Jack's Bad Day

First Ryan looked like this...


Then Ryan looked like this...


Then Jack looked like this...


And Joe looked like this...


The End!

Party Hard with Bon Bons

Suzy and I decided to make the Oreo cookie bon bons last night... It was seriously hard not to eat them all as we made them they were so good!


We skipped putting the white chocolate morsels on top and just filled the holes with the excess chocolate (which didn't make them as pretty as they normally are, but they were still delicious!)... We didn't waste any of the chocolate we used for dipping, we used it to make almond clusters and other hand dipped treats :) So yummy! Now for those of you wondering why the post is called "Party Hard with Bon Bons", let me enlighten you...


Joe likes to wear his Luchadore mask while enjoying his bon bons with wine, This picture was too amazing not to share!

Friday, January 28, 2011

Bad?

Yes, I am bad... At updating my blog on a regular basis! I know, I sound like a broken record! One of my New Year's resolutions was to be better about updating my blog... And in the tradition of breaking resolutions I have been awful at it so far!

So happy be-lated New Year everyone! Ryan and me spent New Year's in Disneyland... With 22,000 other people! It was totally insane, but I am glad we did it, it was definitely a memory I will cherish... My first New Year's living in California!


I also got some super awesome new HOT PINK Minnie Mouse ears covered in sequins!


This is a terrible picture, I was looking at a "Hidden Mickey" on the ceiling when Ryan snapped the picture lol So the downside of going to Disneyland with 22,000 people is all the kids and their germs :( Ryan and me got wicked cases of strep and the flu... it was a pretty brutal way to spend the first few weeks of our New Years. But we recovered in time for a pretty epic boys night at our house...


I am not quite sure what is going on here, but they thought it was pretty funny... Ok more than funny, they had me in stitches until about 3 am!

So on to some more recent stuff... We went to Griffith's park last weekend to enjoy the sunny weather and check out the observatory... It was absolutely gorgeous, I just wish it was clear enough to get a good view of the city...


Way too much smog (ewwww...) to really see it, but we did get a pretty awesome view of the Hollywood sign, and this really creepy bust of James dean!


We also went into the observatory to check out the massive telescope... Very cool!


After we explored around the observatory for a while we headed over to the other side of the park where the abandoned zoo was.


That's Johnny taking a picture of me while I was crawling around one of the old lion cages! Ryan got in on the antics as well by climbing into an old primate cage...


This place was pretty awesome, we plan on going back and exploring more now that we know there's an old abandoned zoo in the middle of the park... So expect more pictures of those antics soon! So I guess that's it for now, I will try to keep my resolution err... I guess I should say resurrect my resolution and post more soon!